Delicious Filter Coffee from an Espresso Machine
Filter 2.0
We’ve all tried to make good filter coffee in an espresso machine. It makes sense, right? Every espresso machine provides access to hot water, a spray head, a filter basket, and usually automatic volumetric dosing. Unfortunately, the flow and pressure provided by espresso machines is generally excessive for brewing great filter coffee.
If cafes could brew amazing filter coffee in an espresso machine, it would be the Holy Grail of brewing coffee by the cup.
After almost three decades of thinking and tinkering, I have finally found a method to brew extraordinary filter coffee in a (Decent) espresso machine in three minutes or less. I’ll call this Filter 2.0 until someone suggests a better name.
Much credit goes to Jonathan Gagné for sparking part of this idea with his long-steep aeropress technique, and John Buckman for his relentless improvement of the DE1 machine.
The pieces of the puzzle
The Long-Steep Aeropress Technique
Jonathan recently developed and wrote about his new aeropress technique that involves a steep of 10 or more minutes. The idea of improving and increasing extraction with a long bloom and removing the liquid extract gently from the coffee grounds is a cornerstone of Filter 2.0. In a cafe setting, I would limit the bloom phase to two minutes. At home, it’s worth experimenting with much longer blooms.
The Filter Sandwich
In May, 2019 I posted on Instagram about my “filter sandwich.” Many years earlier, Andy Schecter had posted online about putting an aeropress filter under his espresso pucks to absorb fats and possibly prevent his blood cholesterol from rising. Andy reported the interesting side effect that the filter allowed him to grind finer and extract (1.5%?) higher. In 2019 I built on Andy’s idea by adding a filter on top of the puck, in an attempt to decrease channeling. The filter sandwich decreases channeling, increases extraction, and also maintains puck integrity when applied pressure is released during the bloom. In the case of Filter 2.0, I recommend using a bottom filter with very small holes of 1—2 microns. More-porous filters will yield coffee with less clarity and possibly more astringency.
The Blooming Espresso
in late 2018, a few months after receiving my DE1, I created the “Blooming Espresso” profile, in which pressure and flow pause for 30 seconds (without opening a valve) to allow the grounds to “bloom” before percolation removes liquid from the puck. The bloom improves extraction quality and quantity, especially from the lower layers of the puck. Filter 2.0 is a filter-coffee variation on the Blooming Espresso with a longer bloom phase.
The Profile Building Capabilities of the DE1
The Decent allows a user to build profiles with as many steps as desired, with features such as temperature profiling, flow control, the ability to move from one step to the next based on a trigger (such as reaching a pressure or volume target) and countless other next-level options. In this profile I used 90°C during preinfusion and 85°C during percolation, a two-minute bloom phase, and a flat 3 ml/s flow rate during percolation. As a safeguard, I set a “pressure limit” of 3 bar during percolation, just in case my grind is too fine. I’m not yet sure whether that is necessary, but it can’t hurt.
The Process
Insert a two-micron 55mm paper filter in the bottom of a clean portafilter basket
Rinse the filter and basket with hot water or latch and flush with hot water.
Fill the basket with finely ground coffee, not quite espresso grind, but far finer than any filter grind. I use settings 2a—2m on a Baratza Forte depending on the coffee. You might try something like #3 (out of 11) on an EK43 or #3 on a Ditting. I use 20g—22g in a 24g basket in order to have enough room for the Flair58 puck screen.
Distribute the grounds, ideally using the Weiss Distribution Technique
Tamping is optional :0. Take a breath. It’s ok to not tamp this.
Set a metal mesh screen such as the Flair58 puck screen on top of the grounds. Ensure the filter is level.
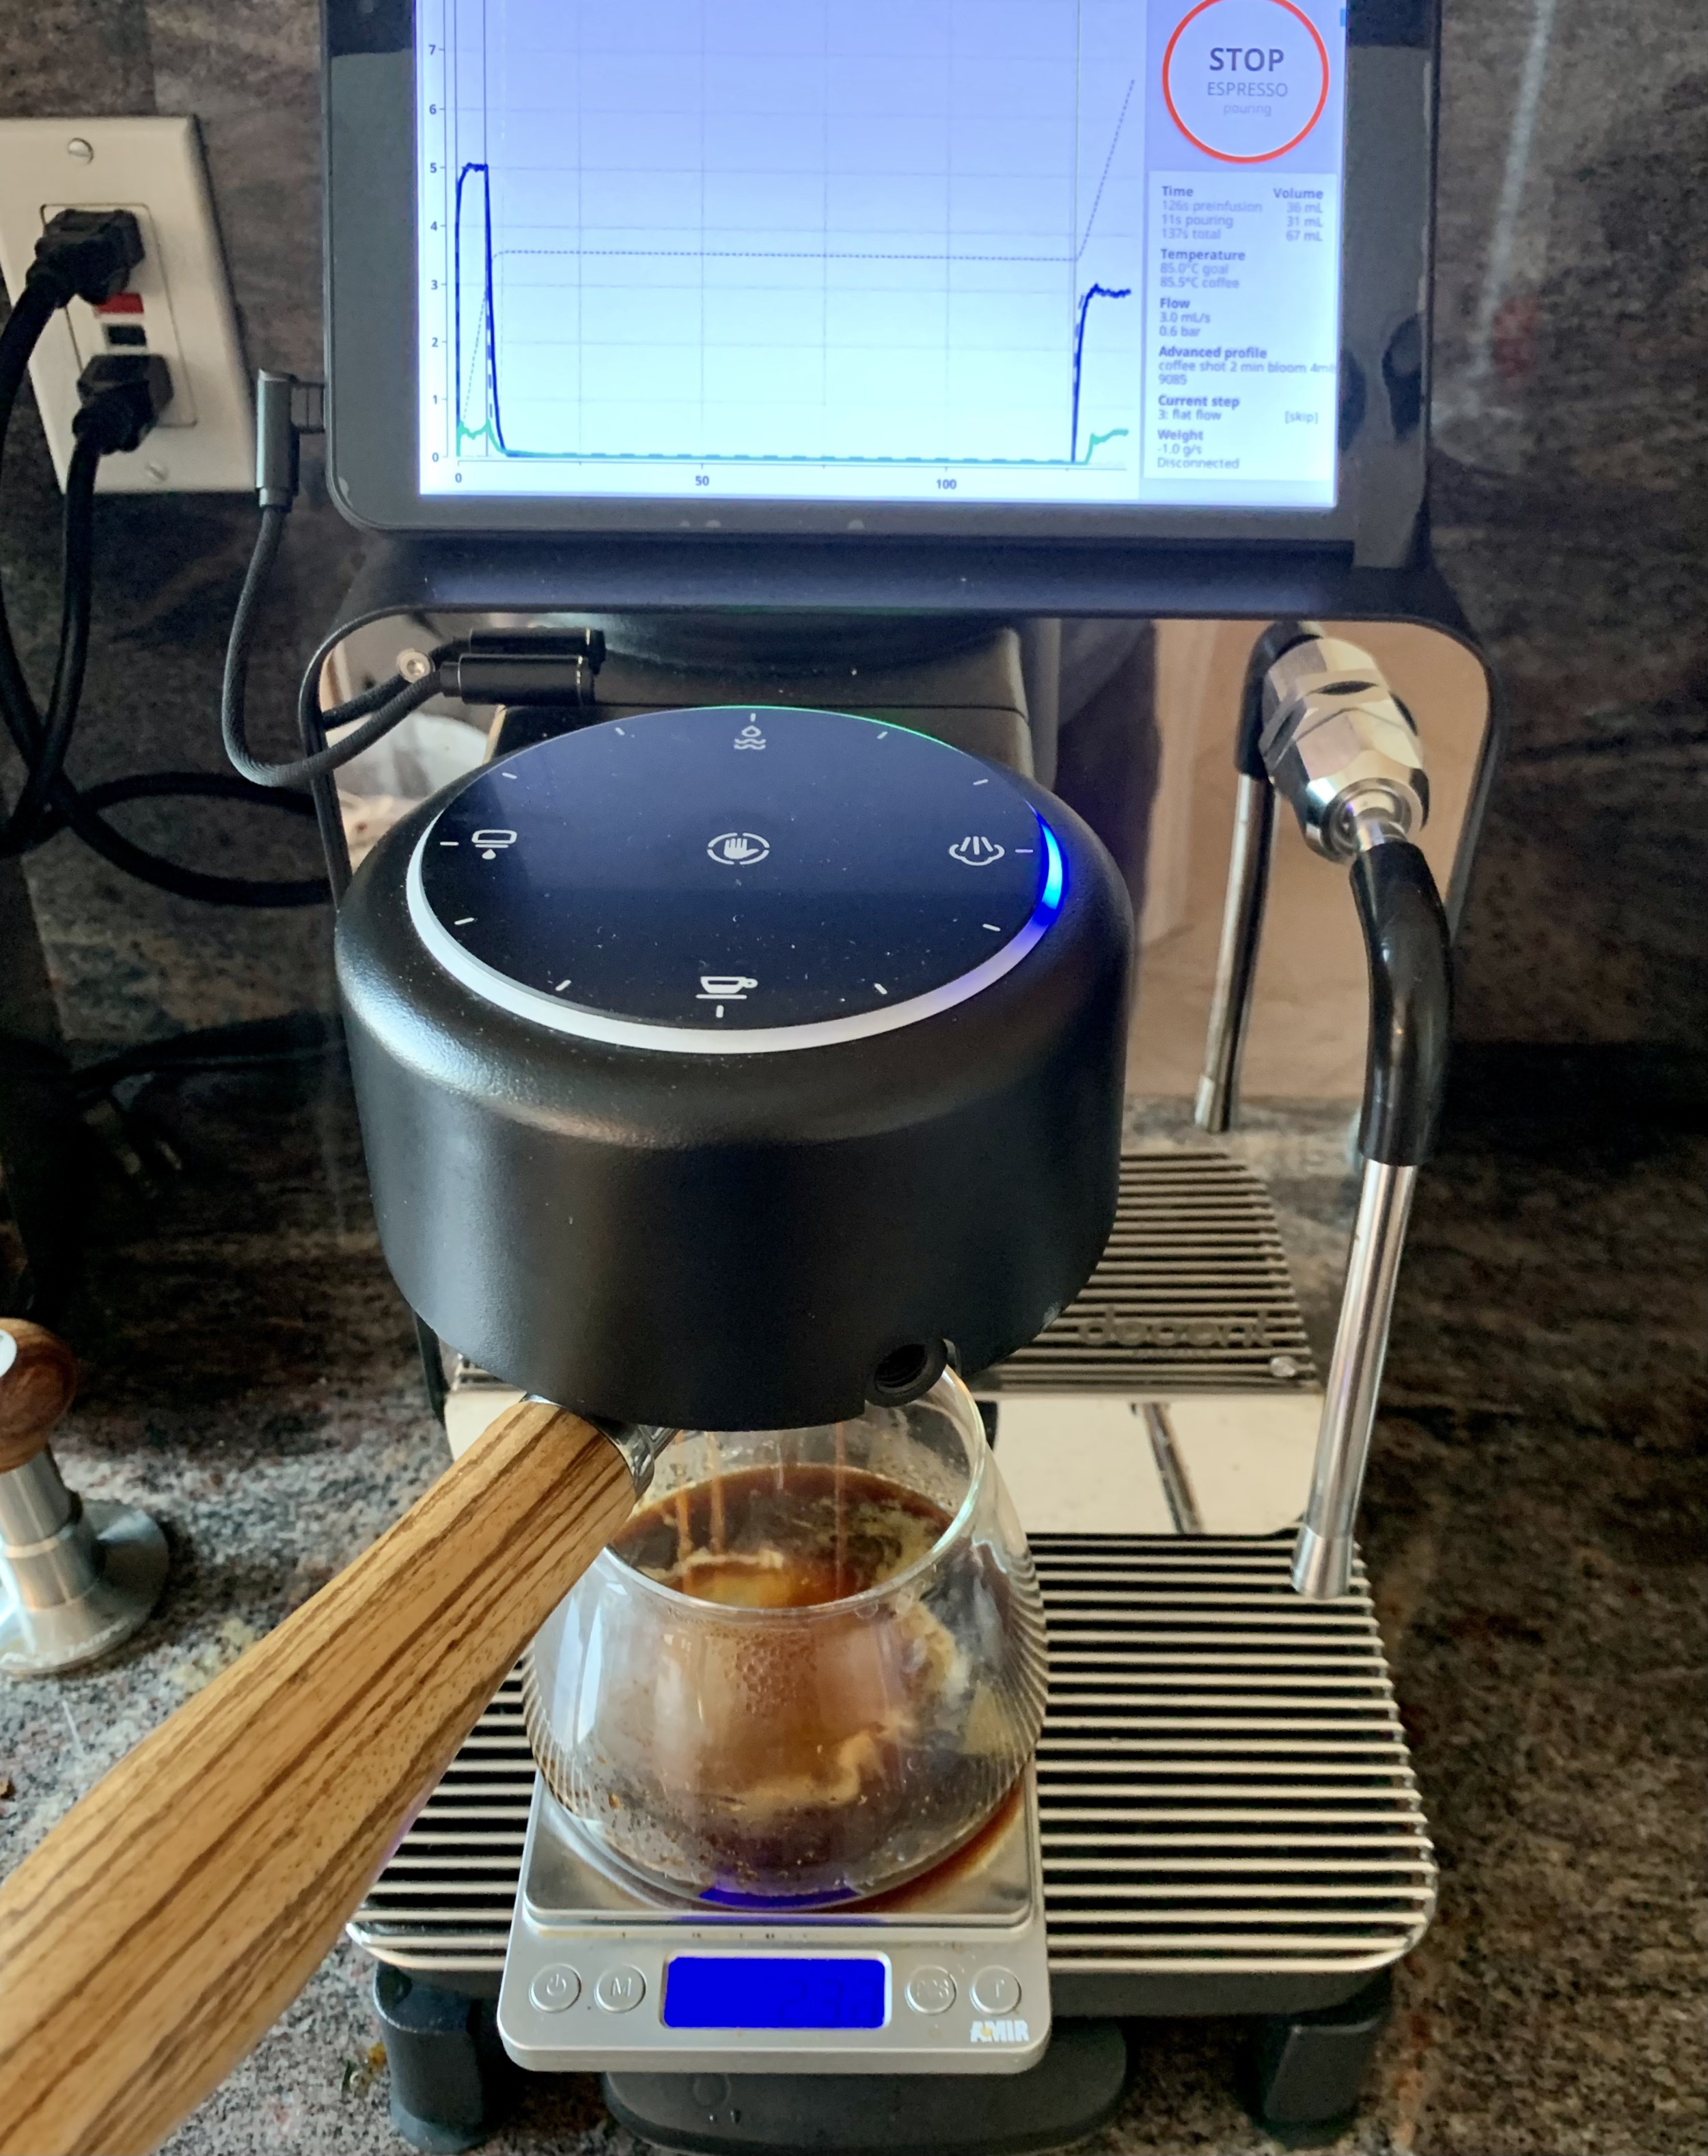
Latch the portafilter on the espresso machine and pull the shot.
Stop the shot at approximately a 5:1 ratio
click on the images below to enlarge

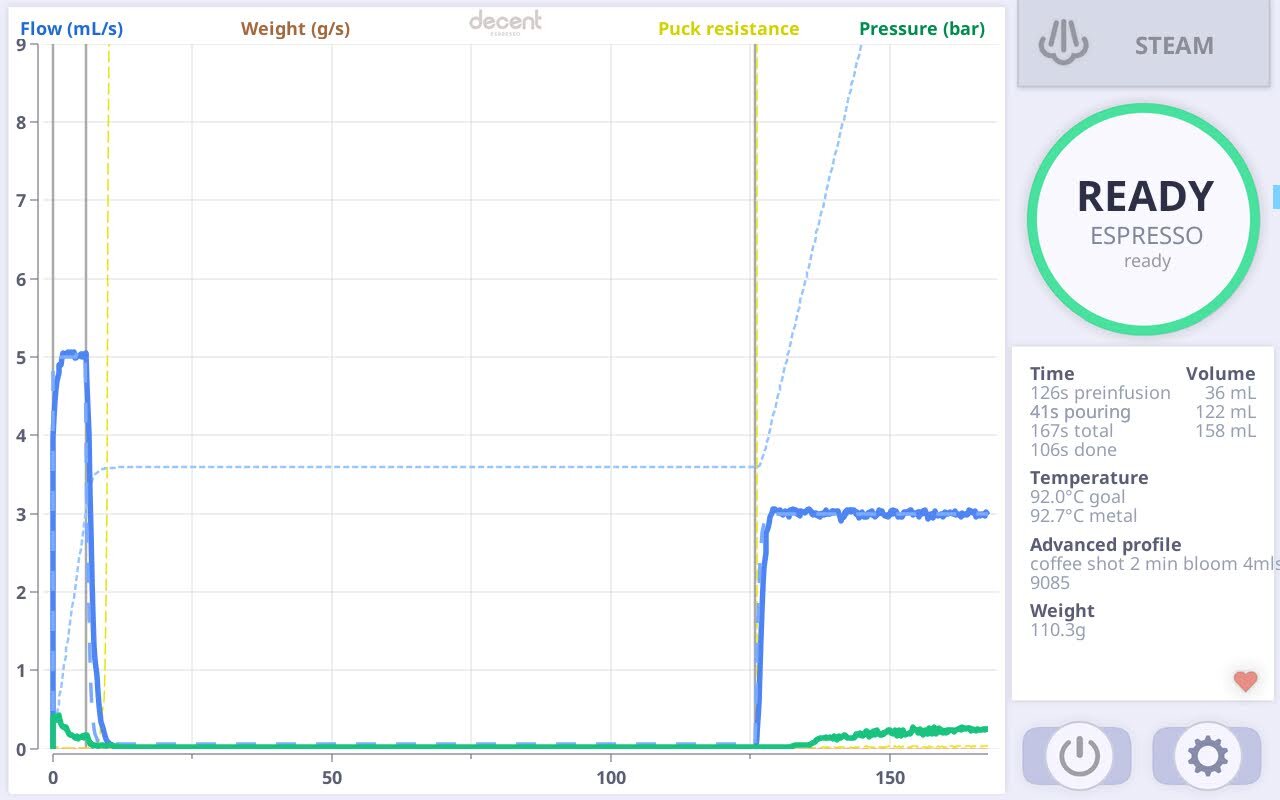


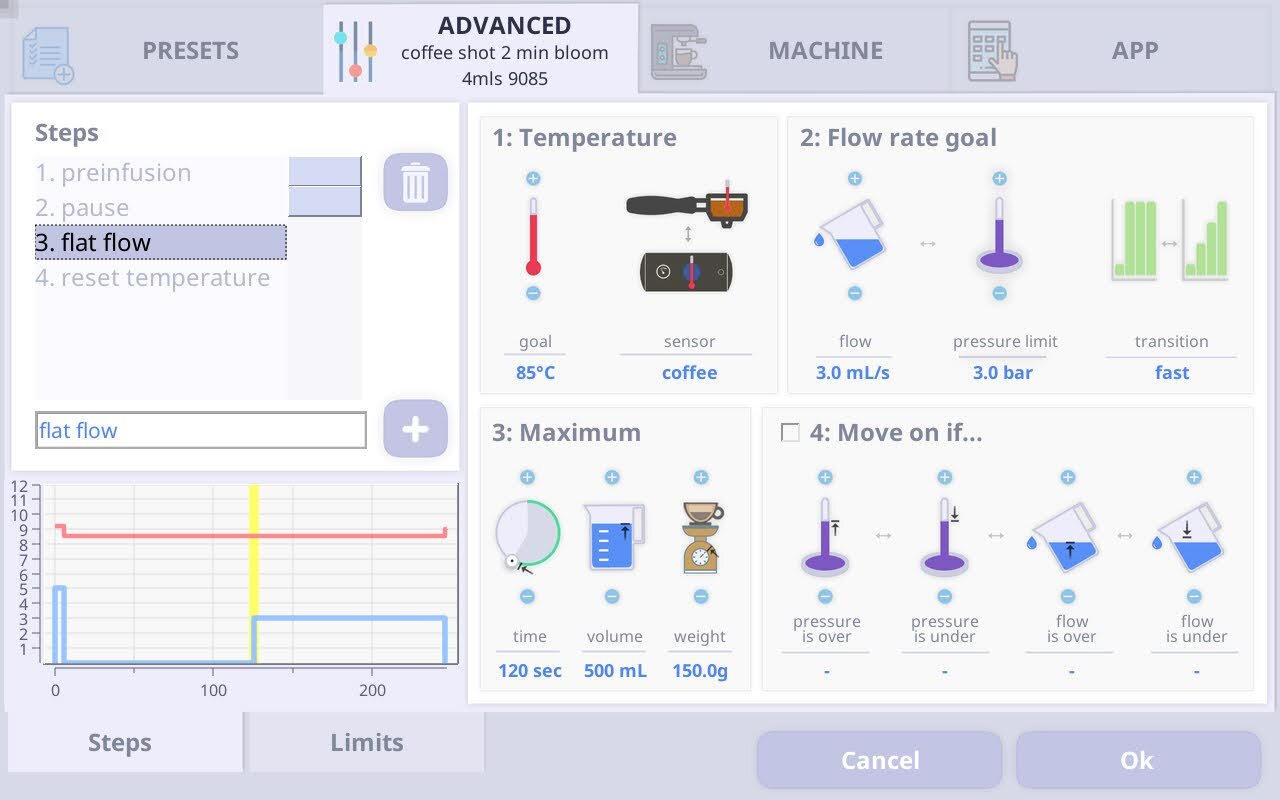
The profile
Preinfusion: I set the pre-infusion time just high enough such that the entire puck will be saturated a few seconds after the preinfusion flow stops. If you are using a Bluetooth scale with the DE1, you can set the pre-nfusion time longer and set the maximum weight to something like 2g, which will cause the profile to move on to the bloom as soon as the scale senses a few drips. An easier solution might be to figure out the number of ml at which you’d like preinfusion to end. Experienced DE1 users will know there are several more sophisticated ways to program just the right amount of preinfusion.
Bloom (pause): As noted, the bloom time is flexible. For use in a café, I think two minutes is adequate. Longer bloom times are marginally beneficial. For use at home, you may want to experiment with much longer bloom times.
Percolation (flat flow): my standard flow rate is 3 ml/s. I find a higher flow rates increase fruitiness of coffee but also increase the risk of astringency. The flow rate should ideally be scaled to dose size. For example, if you are using a small basket and does such as 12 g, you may want to use 2 ml/s but 3 ml/s would be appropriate for an 18g dose. Flow rate should scale more or less in proportion to the depth of the coffee bed .
Pulling a shot
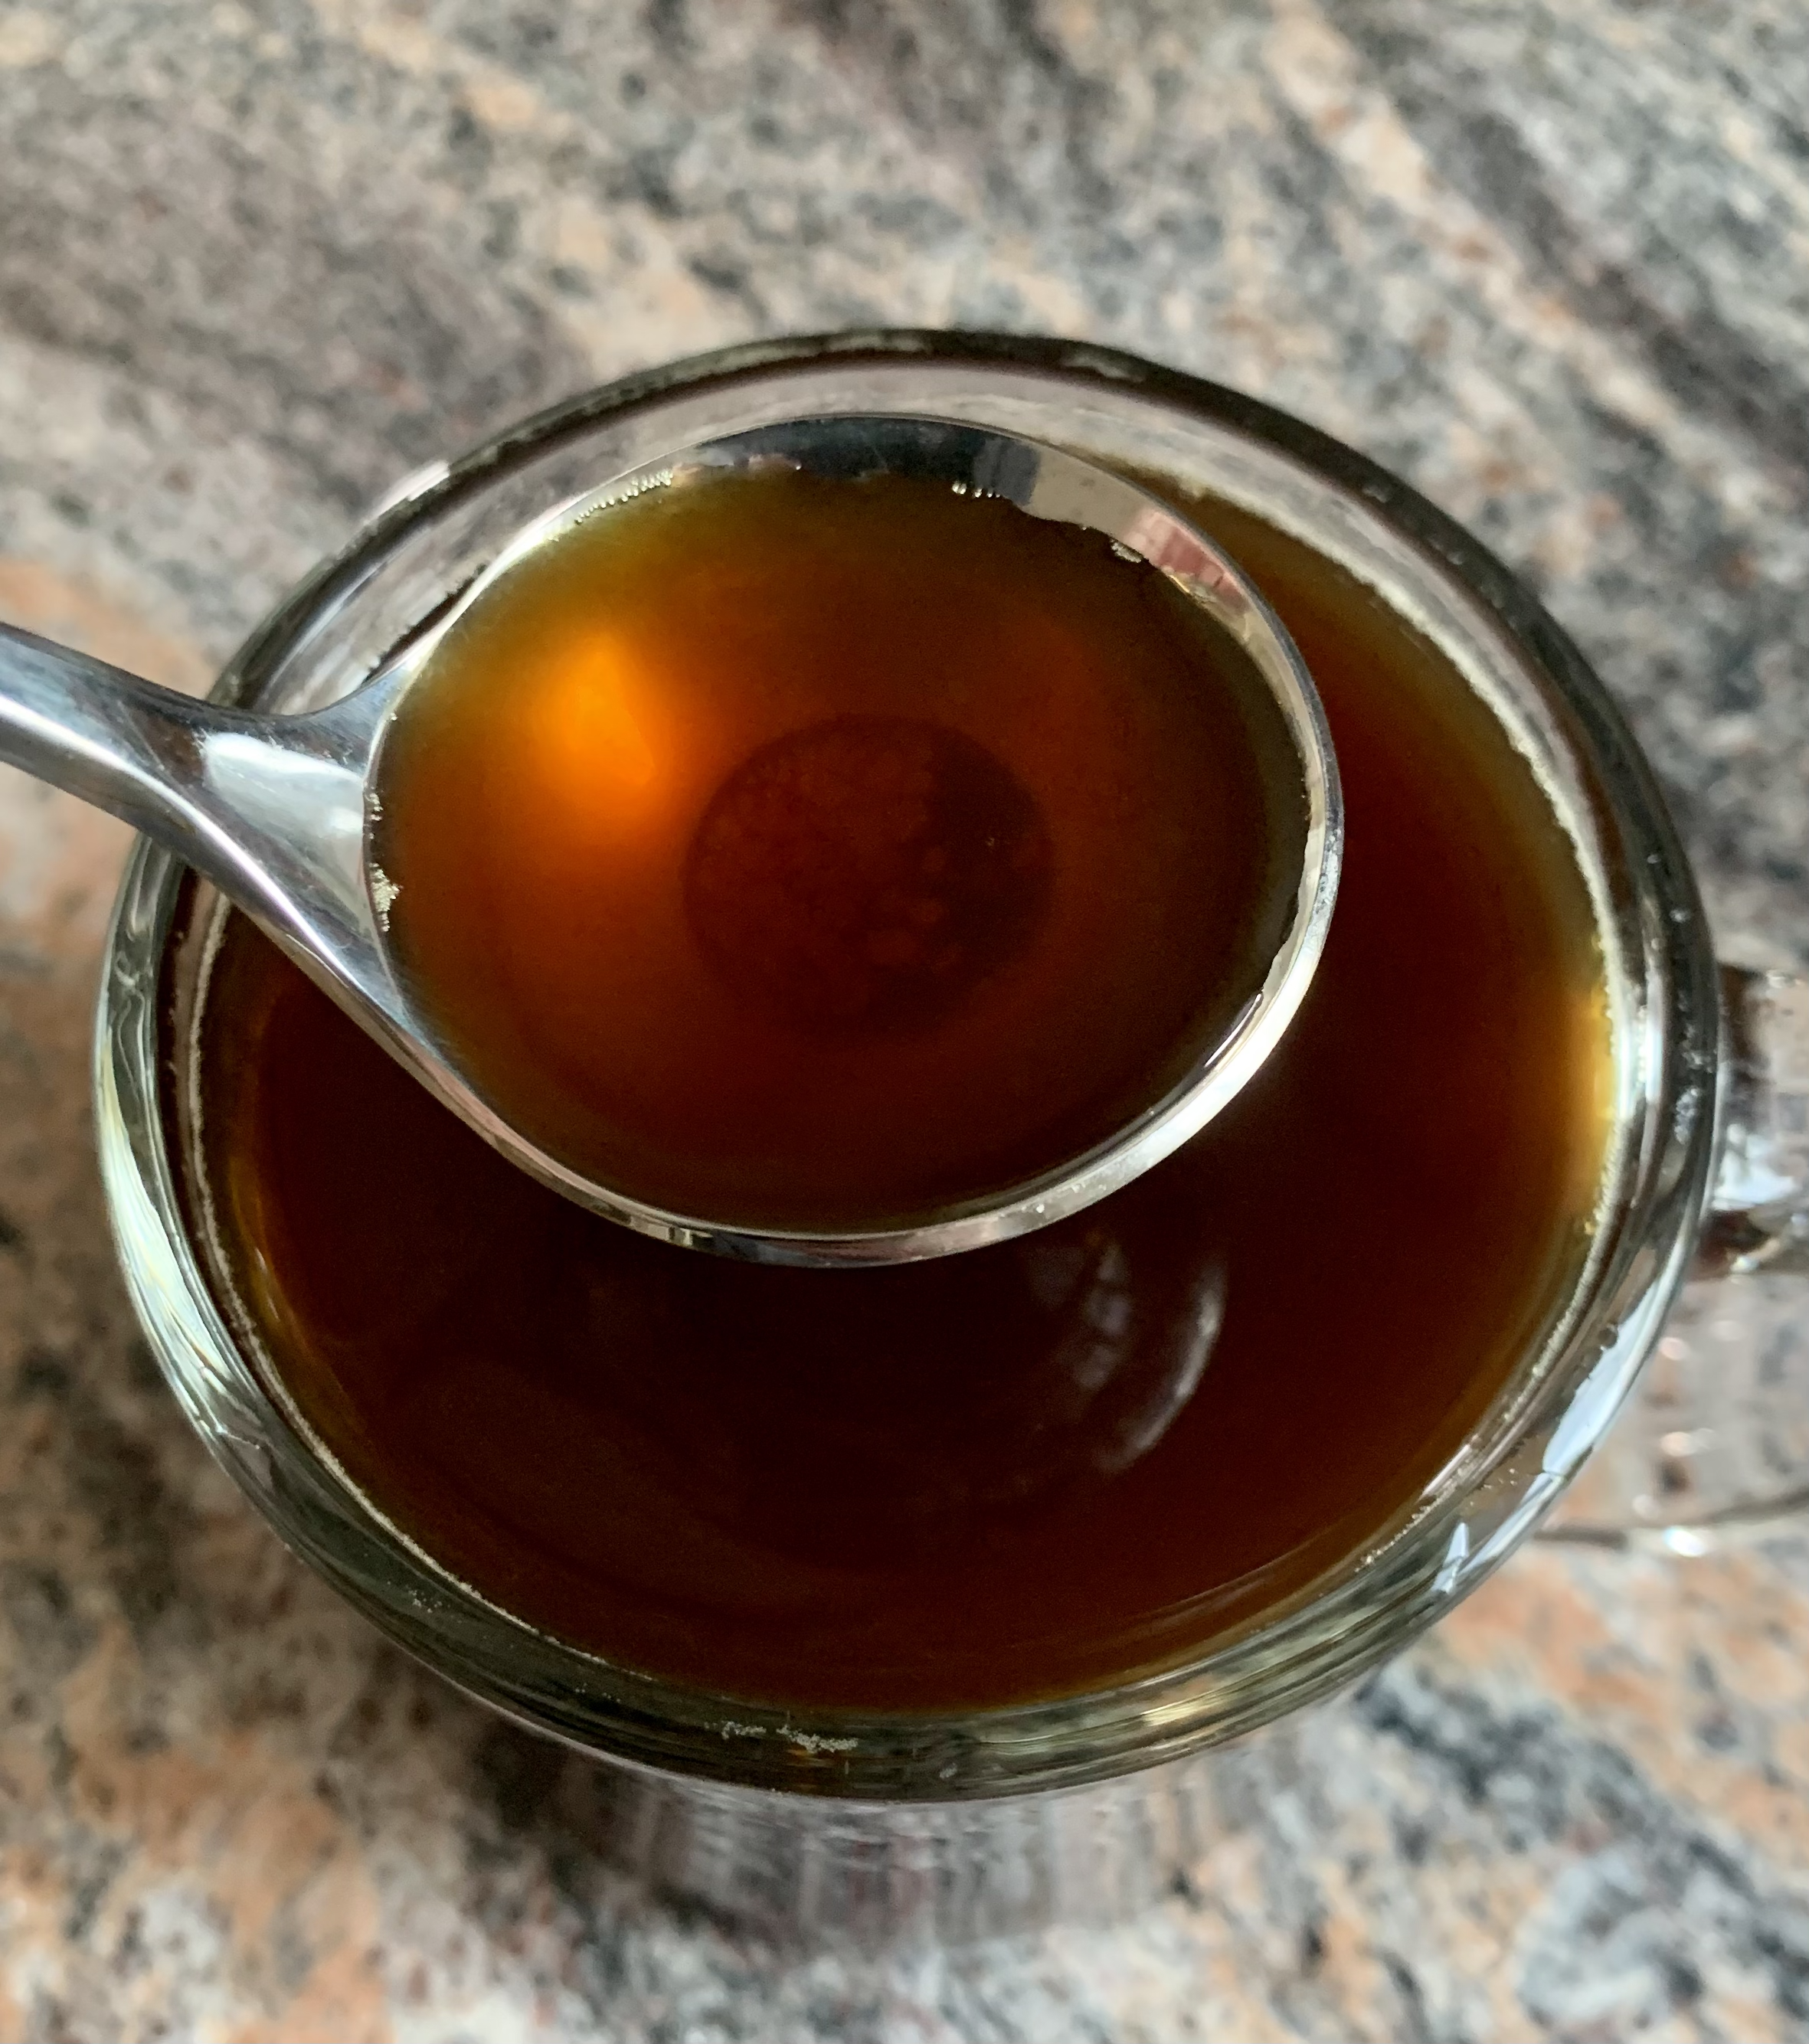
Note that I limit these shots to 5:1 ratios. The shot you see here was made using 20g in a 24g basket with a Flair58 filter on top of the grounds and a 55mm, 2-micron filter under the coffee bed. To mitigate the risk of astringency, I don’t usually exceed a 5:1 ratio. After the shot is complete, I dilute it with hot water to my desired brew strength. The end result is a 20g dose and 100g extraction diluted with 225g—250g of water to yield a 23%—26% extraction with 1.4%—1.5% strength. Of course, all of these numbers are adjustable to taste.
If you sense astringency, consider improving the puck prep, grinding coarser, or putting a finer-mesh filter under the puck.


images:
1.5-micron bottom filter 2.ground coffee 3.tamped coffee (optional) 4.Flair58 puck screen 5.percolation phase 6.The finished, diluted brew
The Coffee
So, how does it taste? It tastes like an incredibly-well-made filter coffee, the kind you hope the barista will make for you, but you rarely get, when you order a pourover. I recommend tinkering with the Filter 2.0 profile to influence acidity and fruitiness and tone down undesirable flavor. For example, one might lower the temperatures when using darker or defective roasts. One could extend the bloom phase to increase extraction when not in a hurry. And one could increase the percolation flow rate to enhance fruitiness, though that may increase the risk of channeling.
What’s Next?
I hope this post inspires others to give this a shot (sorry) and make improvements. I have only been using this profile for a few days, and I’m sure others will make many incremental improvements.
I have one caveat, however: please do not try this shot with a standard, traditional espresso machine. It’s just not going to work well. It is possible to approximate this profile with a lever machine or with an E61 machine with low line pressure, though it’s easiest and best with the DE1.
Every part of this profile is important and works together to produce a great end result. Before experimenting or modifying, please test this profile the way it was designed, using the filter sandwich, DE1, preinfusion, long bloom, low temperature, and low ratio. Skipping or modifying any of these parts is likely to damage extraction quality and enjoyment. Thank you.
NB for DE1 users: John has added this profile to the profile library on the DE1. Simply update your app and you will see it.