
MacGyver is Alive and Well

I’ve had access to an old Probat electric sample roaster recently at a friend’s roastery. The machine is a bit of a dinosaur, and needed some serious MacGyer-ing (if you don’t know MacGyver, look him up; you’re in for a treat.)
Hundreds or thousands of roasters and importers use a version of this machine (and similar dinosaurs) to roast samples. While I’ve had delicious coffee from these machines, I’ve always been suspicious of their consistency. Now that I have had my hands on one of these machines for a few days, I’m certain: it’s impossible to roast consistently on these machines with their standard design. That is obvious from both the data and cupping results.
Those using these machines in their green-buying process need to be concerned that they may often reject coffees due to unrecognized roast issues. If you’re using one of these machines and not noticing their wild inconsistency, I implore you to roast 10 batches of the same coffee on one of these machines, and to cup the coffees blindly. Unless you’re roasting the s**t out of your coffees, the differences between batches should be obvious.
These machines have a several design problems:
• The electric heating elements have high latency and lack precision control.
• The airflow cannot be controlled with precision.
• The small outlet for exhaust air from the drum gets clogged with chaff easily and often.
• The standard temperature probe is poorly positioned and very slow.
• The barrels affect each other’s performance
I’d like to discuss how we tackled these problems to modernize the roaster and have a fighting chance at quality, consistent roasts.

Key:
Dark green circle: Analog temperature probe.
Purple: our MacGyver’d probe and clip
Blue: Wattage meter
Bright green: Airflow knob
Red: Power dial
The electric heating elements have very high latency and lack precision control
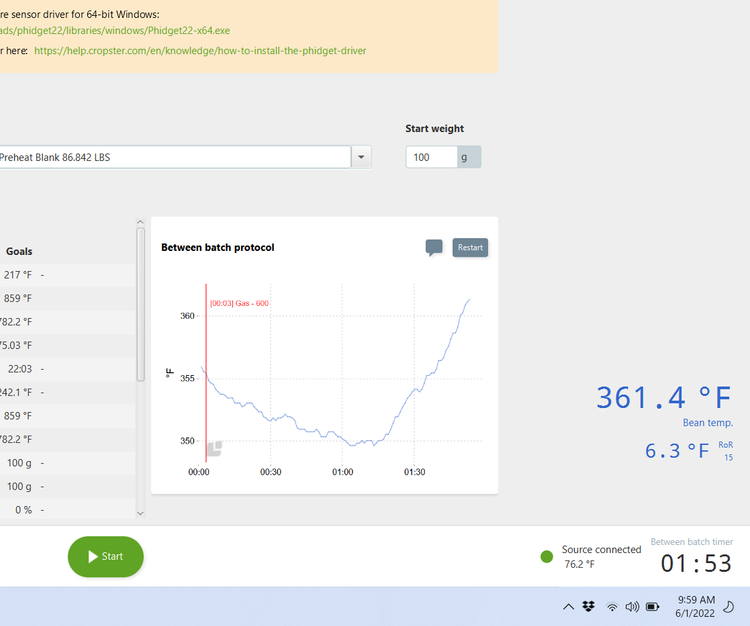
What this means is that when you increase or decrease the power setting, the heating elements heat or cool slowly. How slow is slow? Very slow. Here’s an example below. This is between batches, empty drum, raising the power from 250 watts to 600 watts (the maximum is 880w). Note that it took more than one minute for the BT to begin to rise!
The power settings are controlled with a simple dial, as seen in the photo above (red circle). That dial offers little precision, as we learned when we plugged the machine into a wattage meter.
The airflow cannot be controlled with precision.
The airflow control is a small knob (bright green circle, above) one pulls out (increase) or pushes in (decrease) to adjust the airflow. For reference, the difference between insufficient airflow and excessive airflow is less than 2cm on the knob. Even a 1mm adjustment in the knob has a significant effect on airflow.
The small outlet for exhaust air from the drum gets easily clogged with chaff.
On the back of the machine is a narrow grate, with a 2cm square hole, where the air gets sucked out of the roaster. Unless one shifts to high airflow late in a roast, chaff builds up and partially blocks the hole, decreasing the airflow. Unfortunately, moving the airflow knob during roasting is risky, given that there is no way to adjust it precisely or consistently.
Not only that, but those without proper data logging may not notice the profound effect of shifting airflow. Below we increased the airflow at approximately 1:50. When you see a shift in data like that, it’s difficult to know what is really happening. My goal with this machine is to avoid changing the airflow at all costs.

Our solution to the airflow problem was a combination of “set it and forget it” and measuring the airflow with an anemometer (blue circle), a device that measures wind speed (which is different from airflow; windspeed is m/s, airflow is m^3/s.) With a reasonably precise anemometer, we are able to reset the air level with consistency.

Measuring air speed
The standard temperature probe is poorly positioned and very slow.
The stock temperature probe is in the back of the drum, and meant to measure environmental temperature rather than bean temperature. The probe is very slow and feeds to a mostly-useless analog gauge that changes temperature at a snail’s pace. Let’s just say one should not roast by ET alone, and analog gauges and roasting without proper BT data are very 1920s. I’m pretty sure none of us want to drink coffee the way it was roasted in the 1920s.
Our solution was to mount a clip on the front of the machine to hold and guide a 2mm BT probe in the optimal location.

The barrels affect each other’s performance
While this machine is a two-barrel roaster, the barrels share the same exhaust fan and duct and cannot be used simultaneously without affecting each other. If you desire precise, predictable results, this is effectively a single-barrel roaster.
The results
After our MacGyver’ing, the roasts are more consistent, though not up to modern standards. At least now the machine won’t ruin many samples. We haven’t addressed the high latency of the heating elements, so that will impair precision. It is still challenging to prevent the chaff from sometimes clogging the exhaust port, but we can live with that for the moment.
Late edit: We have attached digital manometer to the machine to have continual air-pressure readings, so we’ll know immediately if the exhaust duct is slowly clogging.
Thanks for reading
