
Some Observations on Hand Pours
Hand pours seem to have died at some point in the past few years, but nevertheless I’d like to do a short posthumous comparison of the most popular methods.I’ve always favored batch brewing, and the cafes I’ve owned have all relied on batch brewing for >90% of their filter coffee. Batch brewing offers more consistent results, and generally better extractions, than any hand-pour percolation method. However, batch brewing may not be a practical option for a home barista, or for a cafe or restaurant that serves fewer than 100 cups of filter coffee per day, or for a cafe wanting to offer a menu of very expensive coffees.
There is, and always has been, a serious problem with hand-pour extraction quality in specialty coffee. Of the 2,000 or so hand pours I’ve ordered and paid for (ugh) at cafes, perhaps two dozen were as well-made as a good batch brew. WTF? That’s a 1% success rate, and almost $8,000 USD spent on mediocre brews. (I won’t even mention the ones that turned out to be naturals after the baristas had assured me they were washed coffees!)
Exceptional filter coffee requires a relatively even extraction at a reasonable temperature; my preference would be for a slurry temperature of 89℃--93℃ (192 ℉--199℉). To achieve this consistently using percolation requires:
a prewetting phase
some turbulence
minimal channeling during percolation
How to make a good hand pour
Prewetting
Prewetting contributes to a more uniform extraction by decreasing channeling and moistening soluble material deeper in the coffee bed, as well as deeper in the ground particles themselves, before percolation removes a significant amount of solubles from the coffee bed. A good plan is to use a 3:1 ratio, by weight, of water to grounds during prewetting. Coffee grounds can absorb up to twice their weight in water, but inevitably some brewing liquid escapes the coffee bed during prewetting. Therefore, a 2:1 ratio will not completely saturate the coffee bed with liquid. I’ve found 3:1 to be a reasonable ratio to achieve full saturation.
I cannot emphasize this enough, and I have a feeling I’ll still be arguing this point decades from now: agitating the slurry during prewetting is beneficial. Please do it. The most frequent argument i hear against agitation during prewetting is that baristas will do it inconsistently. Fair enough; that’s probably true. What’s also true is that passive (non-agitated) prewetting is more inconsistent than prewetting with agitation done by a barista with minimal training. When I got my first refractometer, one of the first things I measured was the variance of the extraction levels my V60 pours with, and without, agitation during prewetting. The difference was dramatic; agitation during prewetting decreased the variance so much that it wasn’t even worth calculating the difference in variance. To me, that indicated agitation during prewetting improved extraction uniformity.

kalita-prewet-bubbles
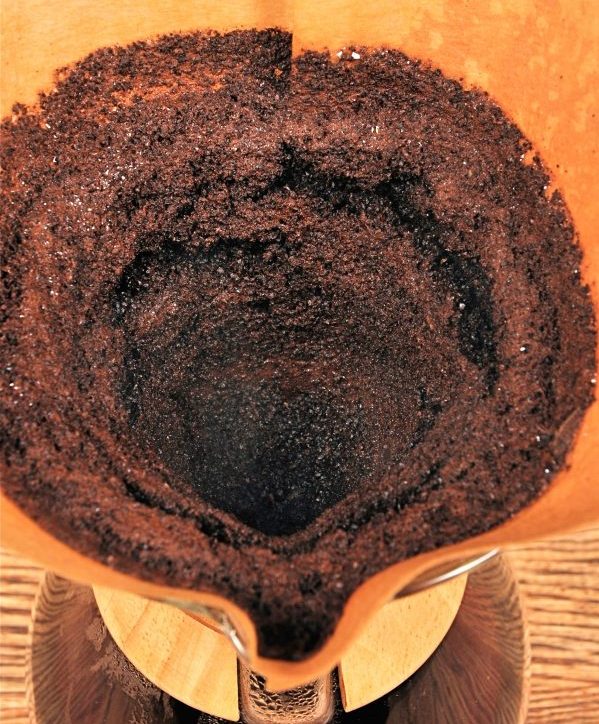
One simple test of the success of your prewetting method is to note how long it takes for bubbles to stop rising to the top of the slurry during prewetting. Each time you see a bubble appear during prewetting, it indicates a dry area of the coffee bed just got wet and released some carbon dioxide. If bubbles form over the course of one minute, it means some areas of the coffee bed did not get wet for a full minute after prewetting began. In addition, consider that the last grounds to get wet were likely wetted by liquid packed with coffee solids; such liquid is a poor solvent. On the other hand, the first water to contact the grounds during prewetting is low in solids, and an excellent solvent. The net result is some grounds get a big extraction headstart , both in time and rate.
I recommend prewetting with careful agitation, such that no bubbles form more than 10-15 seconds after you begin pouring. It may be wise to use the minimum agitation necessary to achieve that goal, though, as too much agitation may cause fines to plug the pores of a paper filter.
Turbulence
Turbulence increases the rate of extraction and, if used wisely, can improve extraction uniformity. There are a few ways to increase turbulence during brewing: stirring, pouring at a faster rate or from a higher position, or spinning the filter. How to best utilize turbulence will vary depending on the brewing apparatus, but generally I recommend stirring during prewetting and adding a form of turbulence again as soon as you’ve finished pouring water on the grounds.
The Rao Spin
A couple of years ago I began noticing references online to various versions of something called the “The Rao Spin.” This intrigued me, as I hadn’t invented any of those methods, but somehow my name was attached to them. (There are other Raos in the world, but I’m pretty sure most of my relatives live in Southern Italy, drink robusta-laden espresso, and think hand pours are dishwater.)
Last year I walked into Aroma Caffe in Bologna, one of Italy’s rare third-wave cafes, and had one of most surprisingly wonderful coffee experiences of my life. Aroma (full name: Bar Aroma Degustazione E Vendita Di Caffe' Pregiati) is owned by one of the world’s nicest couples, Cristina and Alessandro. I asked Alessandro to make me a hand pour of one of Rubens Gardelli’s coffees (I forget which it was, but it was lovely), and Alessandro brewed a flawless extraction during which he spun the entire v60 after he finished pouring the brewing water. Alessandro thought it was quite funny that I’d never seen or heard of this method, given that it had been named after me. Here’s a 7-second video of Alessandro doing the Rao Spin:
https://www.youtube.com/watch?v=jopwfCGxj10
I don’t know why the Rao Spin works so well, but it minimizes channeling during the final drawdown and creates a flat spent bed every brew. It’s so good, I wish I had invented it :).
Note: I did invent a method involving a light thump of the brewer during the drawdown. It also decreases channeling, but I’ve come to favor the Rao Spin. Occasionally I will use both during a brew.
Channeling
A good batch brewer has a wide, flat spray head that disperses water more evenly over the coffee bed than can be done using a kettle. Pouring from a kettle is more likely to create channeling during wetting. Spinning or thumping the filter, pouring strategically, and using a coarse-enough grind can all help prevent channeling.
Which Hand Pour Method is Best?
To my mind, there are three main categories of percolation hand pours:
Cone-shaped filter (V60/Melitta)
Flat-bottomed filter (Kalita)
Steep-and-release (Clever)
Each has its strengths and weaknesses.
Cone filters (V60 and Melitta, etc)*

one-cup-pourover-perfect-bed
The main advantage a V60 or Melitta filter is that, when using the right filter size, a barista can add all of the post-prewet water quickly, in one steady pour. Pouring all of the water at once, instead of in stages, allows the barista to keep the slurry temperature high enough to guarantee crisp, non-sour acidity every brew. I’ve had tasty V60s that had been poured in stages, but more often than not, brews poured in stages have had soggy, sour acidity indicative of low-temperature extraction.
Like many past trends in third-wave coffee (ristrettos, underdeveloped roasts, underextracted hand pours), baristas seem to accept to a level of sourness in coffee that I personally find unpalatable. Feel free to like sour coffee, of course, but please don’t condescend to others who don’t. I say this because of the countless times baristas have told me they “educated” customers who had complained of sour coffee. If a customer complains a coffee is sour, it is probably because the coffee IS sour. Crisp, vibrant, winey acidity is wonderful, but I can’t get excited about sour coffee.
*Those who know me know me know there’s not much point in asking about Chemex.
Flat-bottomed filters (Kalita)
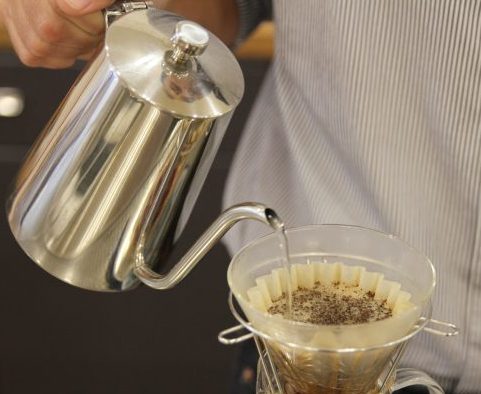
photo by Liz Clayton
Kalita’s main advantage is that it facilitates even extractions. However, the devices are relatively small and force baristas to brew small amounts of coffee or to pour in stages. (This is a problem with many other small brewers as well.) My only real complaint about the Kalita is that the folds in fluted paper filter tend to trap grounds. I’ve heard there are non-fluted Kalita filters now, but haven’t seen one yet.
Steep-and-release brewers (Clever, etc)

clever-dripper
I would love to see more cafes choose steep-and-release devices such as the Clever Dripper more often for their hand pours. I find the best-made V60s and Kalitas to be slightly more to my liking than the best Clevers, but the Clever is much easier to make well, an important consideration. A well-made Clever is simple to execute:
chose a reasonable grind setting and water: grounds ratio
pour 94℃--95℃ water from a kettle, ensuring all of the grounds are wetted quickly.
give the slurry a gentle stir after pouring
cover the Clever
at the chosen time (2:00, 3:00, etc), remove the cover, give the slurry a gentle stir to unstick grounds from the filter, and set the Clever on a mug to drain.
That’s it. Clever is technically more of an immersion brew than a percolation brew, so there is no point in prewetting. A novice barista, given a recipe of time, temperature, weights, and grind setting, should be able to create an extraction that’s an 8/10 with five minutes of training. I can’t remember the last time an experienced barista poured me a V60 I would rate an 8/10.
But what about Chemex?
chemex-high-and-dry-filtered-179
Many coffee professionals like the Chemex. I really don't. A good brewer facilitates a quality extraction. The Chemex makes a qualityextraction very difficult. Therefore, the Chemex is not a good brewer. You may have really enjoyed coffee from a Chemex in the past, but it is more likely you were enjoying a beautiful bean roasted well, than a great extraction.
The problem with the Chemex is that it forces the barista to pour slowly, in stages, and creates a very slow drawdown. A slow drawdown itself is not a problem, but in an open-top brewer constantly losing heat, it is. A slow pour and slow drawdown yield very low extraction temperatures. Pouring a Chemex quickly enough to at least begin with a high extraction temperature will yield high-and-dry grounds during the drawdown. If you must use a Chemex, brew no more than 16oz (475ml) or so, pour quickly, spin the slurry, and pray hard, you may end up with a passable extraction. My advice is to use Chemex for your naturals and serve them to your least-favorite customers.
But what about all of those brewing competitions?
Some readers may protest some of my ideas about hand pours because various brewers cup champions have used methods diametrically opposed to my recommendations here. There are a few problems with that line of reasoning:
It assumes the winners of competitions made great brews. Friends who have judged many championships have confirmed my suspicion that great cups are few and far between, even in the finals.
A competitor may get lucky with a brew during a competition, but not be able to reliably replicate the quality of that brew; my recommendations are designed to deliver great brews consistently. The best strategy for winning a competition is do something high-risk, high-return that will stand out from the crowd. (See: how a maniac won the Republican US presidential nomination.) That is not a good strategy for serving hundreds of consistently excellent coffees to paying customers.
Winners in different countries or different years may use opposite methods; if there is no pattern to what produces winners, it should make one suspicious of competition standards.
Thanks for reading.